


The “Cannot Connect to SQL Server” error is one of the most common headaches for developers, DBAs, and IT admins. It can stop your work instantly and leave you wondering where to even begin.
The good news? Almost every case comes down to a few fixable issues. This guide breaks down each cause with short, clear steps so you can get back to work fast.
What This Error Fix “Cannot Connect to SQL Server”

When you see “Cannot Connect to SQL Server,” your client app simply can’t reach the SQL Server instance.
The cause could be on the server side, the client side, or somewhere in the network between them.
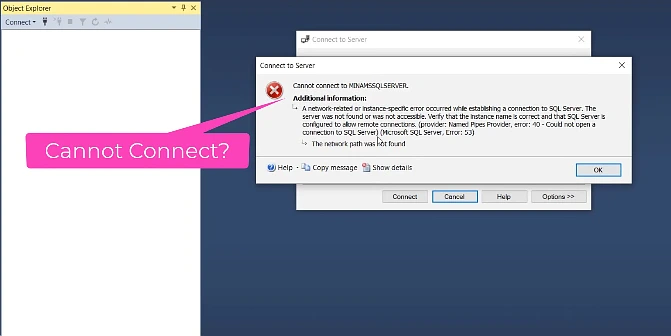
A typical error message looks like this:
A network-related or instance-specific error occurred while establishing a connection to SQL Server. The server was not found or was not accessible.
Each phrase is a clue. “Server was not found” means a name issue. “Not accessible” points to firewall or remote settings.
Common Causes at a Glance

Before jumping into fixes, here are the usual suspects:
- SQL Server service is stopped.
- TCP/IP protocol is disabled.
- Wrong server name or instance.
- Firewall blocking the port.
- SQL Server Browser service off.
- Remote connections disabled.
- Authentication mode mismatch.
- Wrong port configuration.
- Network connectivity problems.
Solution 1: Check if SQL Server Service is Running
This is the #1 cause and the easiest to fix.
Press Windows + R, type services.msc, and press Enter.
Look for SQL Server (MSSQLSERVER) or SQL Server (SQLEXPRESS) in the list.
If the status is blank or “Stopped,” right-click and select Start.
Also set the Startup Type to Automatic, so it runs every time Windows boots.
Using a named instance? Start the SQL Server Browser service too.
Solution 2: Enable TCP/IP Protocol
By default, TCP/IP is disabled in many SQL Server installs, especially Express editions.
Open SQL Server Configuration Manager from the Start menu.
Expand SQL Server Network Configuration and click Protocols for [your instance].
Right-click TCP/IP and choose Enable.
Now go to SQL Server Services, right-click your instance, and click Restart.
Your remote connections should now work.
Solution 3: Use the Correct Server Name
A wrong server name is one of the top reasons for this error.
Use these formats based on your setup:
- Local default instance:
localhost,., or(local) - Local named instance:
localhost\SQLEXPRESS - Remote server:
192.168.1.100,1433orServerName\InstanceName
Not sure of your instance name? Check Configuration Manager under SQL Server Services.
The name in parentheses is your instance name. MSSQLSERVER is the default.
Solution 4: Open Windows Firewall Ports
The Windows Firewall blocks SQL Server traffic by default.
You need to open two ports:
- TCP 1433 for SQL Server
- UDP 1434 for SQL Browser (named instances)
The fastest way is using PowerShell as Administrator:

powershell
New-NetFirewallRule -DisplayName "SQL Server" -Direction Inbound -Protocol TCP -LocalPort 1433 -Action Allow
New-NetFirewallRule -DisplayName "SQL Browser" -Direction Inbound -Protocol UDP -LocalPort 1434 -Action Allow
If you use third-party antivirus or firewall tools, add the same exceptions there.
Solution 5: Allow Remote Connections
By default, some SQL Server editions allow only local connections.
Open SQL Server Management Studio (SSMS) and connect with Windows Authentication.
Right-click the server name in Object Explorer and choose Properties.
Click the Connections page and check “Allow remote connections to this server.”
Click OK and restart the SQL Server service.
Solution 6: Fix Authentication Mode
If you’re using a SQL login like sa, but the server only allows Windows Authentication, your connection will fail.
In SSMS, right-click the server and choose Properties.
Go to the Security page and select “SQL Server and Windows Authentication mode.”
Click OK and restart the service.
Also check that your SQL login is enabled under Security > Logins.
Solution 7: Set a Static Port
Named instances often use dynamic ports that change on every restart. This makes firewall setup messy.
Open SQL Server Configuration Manager and go to Protocols > TCP/IP > Properties.
Switch to the IP Addresses tab and scroll to IPAll.
Set TCP Port to 1433 and clear the TCP Dynamic Ports field.
Restart the SQL Server service.
Now your instance always uses port 1433 — predictable and firewall-friendly.
Solution 8: Test Network Connectivity
If everything looks right but it still won’t connect, the issue may be the network itself.
Run this PowerShell command from the client:

powershell
Test-NetConnection -ComputerName YourServerName -Port 1433Or use telnet:
cmd
telnet YourServerName 1433If these fail, it’s a network problem, not a SQL issue.
Check DNS resolution, ping the server, and confirm no network firewall is blocking traffic between subnets.
Quick Diagnostic Checklist
Use this fast checklist to spot the cause:
- Connection times out → firewall or service stopped.
- “Server not found” → wrong name or Browser off.
- “Login failed” → it’s an authentication issue.
- Works locally, fails remotely → remote connections off.
- Worked yesterday, not today → check Windows updates or policy changes.
How to Prevent This Error in the Future
A few habits can save you hours of troubleshooting later.
Set all SQL Server services to Automatic startup.
Document your instance names, ports, and login types clearly.
Use static ports instead of dynamic ones.
Name your firewall rules properly so they don’t get deleted by mistake.
For production servers, set up monitoring tools like SCOM, Zabbix, or PowerShell scripts to alert you when SQL Server stops responding.